
Inspired, in part, by a driftwood mobile I saw last summer, I thought it would be interesting to design a mobile based on the Fibonacci numbers. The Fibonacci Sequence, as you may know, is a list of numbers that begins with two 1s, and continues on with each succeeding number equal to the sum of the previous two. Thus, the Fibonacci Sequence begins: 1, 1, 2, 3, 5, 8, 13, 21, 34, 55, 89,
, and continues on indefinitely.
The basic idea of a Fibonacci Mobile is to use adjacent pairs of Fibonacci numbers as the balancing weights on the arms. So, for instance, a mobile might have a weight of 5 on one end, and a weight of 8 on the other end. The law of levers implies that the balance point must be 5 units from the heavier end, and 8 units from the lighter end. The core idea here is that you end up with an asymmetrical mobile, but one that still balances perfectly. The fact that the ratios of adjacent Fibonacci numbers approach the Golden Ratio in the limit suggests that the resulting asymmetry may be aesthetically pleasing as well.
Things get more interesting when you start thinking recursively, and see that the weights of 5 and 8 needed for the example above may be realized by making smaller mobiles. A mobile with a weight of 8 can be be built with smaller mobiles of weights of 3 and 5, and that a mobile with a weight of 5 can be built with mobiles of weights 3 and 2, and so on down to the 1s.
An Order 13 Fibonacci Mobile
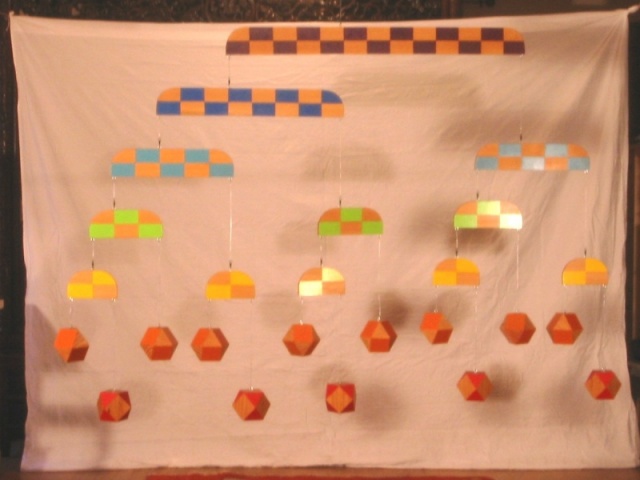
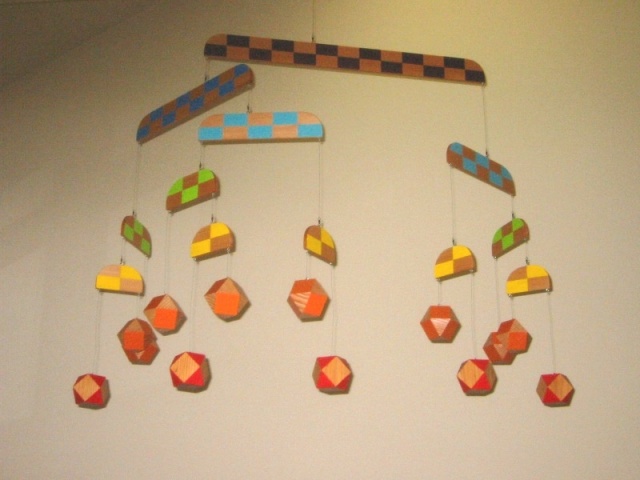
A further refinement to this plan is to suspend the elements at different heights. If you follow the rule that each heavy side is suspended with a length of 1, and each light side with a length of 2, you discover a very pleasing result: each level of the mobile consists of elements of the same size. Emphasizing this with a simple coloring scheme leads to the following:
Fibonacci Mobile with Height Adjustment
Now the Fibonacci Sequence can be clearly seen in the size of the elements at each level. Moving up from the bottom you can see elements of size: 1, 1, 2, 3, 5, 8, and 13. The size of each element also indicates the total number of blocks below it.
Another happy result of this arrangement can be found by counting the number of elements at each level. Counting down from the top we get: 1, 1, 2, 3, 5, 8, 5. Oops, sorry about that final 5. But if you continued to hang strings of lengths 1 and 2 down from each level, the level above the bottom would contribute another 8, and that would make 13 elements in the bottom row.
So this is my design for an order 13 Fibonacci Mobile. It is easy to imagine how you could expand this design to make mobiles of order 21, 34, or more.
Prior Art
Having invented the Fibonacci Mobile, I did a simple Google search and, a bit disappointingly but not too surprisingly, I found Fibonacci mobiles that predated mine. Alison Frane of Loony Labs and Susan Goldstine of Saint Marys College of Maryland have created a number of different mobiles based on the Fibonacci Sequence. But I do claim as novel the idea of the single and double length suspensions, leading to the top-down Fibonacci count of the elements.
Rabbits
When Mr. Fibonacci (aka Leonardo de Pisa) first described the sequence bearing his name, he used it to solve a problem in rabbit population growth. He modeled the reproductive behavior of a pair of rabbits as producing one breeding pair of offspring in one generation, another pair in a second generation, and no others after that. This rather unlikely rabbit behavior is at least easy to analyze, and yields the Fibonacci Sequence as the number of pairs of rabbits born each generation. This design for the Fibonacci Mobile diagrams this behavior exactly, where each element represents a pair of rabbits. The element below and to the left is their first pair of offspring, and the element below and to the right is their second.
Width and Self Intersection
One of the desirable features of any mobile is its ability to spin about freely, without running into itself, and this design fulfills the requirement nicely. In fact, for any possible alignment of the arms, each level is symmetrical about its balancing point. Starting, for example, at the top element and descending always to the left we get steps of 5 + 3 + 2 + 1 + 1 to the leftmost block, for a total distance of 12. If we descend to the right we get 8 + 3 + 1, also 12. If you pick any other path from the top to a block on one of the bottom two rows, you will always get a 12, one less than the width of the arm. This works for any level in the mobile. Since the width of the arm is always one greater than the distance to the block, the blocks will never bump into each other no matter how the mobile is aligned.
Achieving Reality
I was sufficiently intrigued by the Fibonacci Mobile that I decided to make one out of materials from the real world. My favorite artistic medium is wood, so I chose clear fir for both the blocks and the arms. For the blocks I began with a 4 by 4 cut into equal sized cubes. For visual interest I decided to cut small corners off the cubes to create truncated cubes, but then chose to go a little further, cutting large corners off each cube to create cuboctahedra. This gave the blocks a more interesting shape, and was a great excuse to acquire a compound miter saw (no child should be without!). It also facilitated a pleasing method of distinguishing the two different levels of blocks. The bottom row has the triangular faces painted red, and each block is suspended at a square face. The row above has the square faces painted orange, and each block is suspended at a triangular face.
For the arms I originally planned to use 1 1/2 by 1/4 inch lath, but that proved to be insufficiently strong for the task, so I upgraded to 3 1/2 by 1/2 inch clear fir. These were cut to the various lengths using 3 inches as the fundamental unit, and rounded at the corners for looks. This put the overall size of the mobile at about 6 feet wide by 4 feet tall.
All of the wooden elements were first sealed with Varathane, then painted in rainbow colors with glossy enamel paint. The arms were painted in alternating rectangles of color to emphasize the placement of the balance points.
I initially planned to use high test fishing line to connect the elements, but found it too difficult to tie good, reliable knots at the correct lengths, so I switched to 20 gauge galvanized steel wire. This I twisted onto eye screws set in the tops of the blocks, at both ends of the bottom of each arm, and at the balance point at the top of each arm. The balance points also employ ball-bearing fishing swivels, allowing the mobile to spin freely without twisting the wires.
By assembling the mobile from the bottom up, it was possible to find the balance point for each level experimentally, by balancing the top arm on a rounded pipe, and marking the spot of perfect balance.
Mobile in Canonical Alignment (all short links to the left)
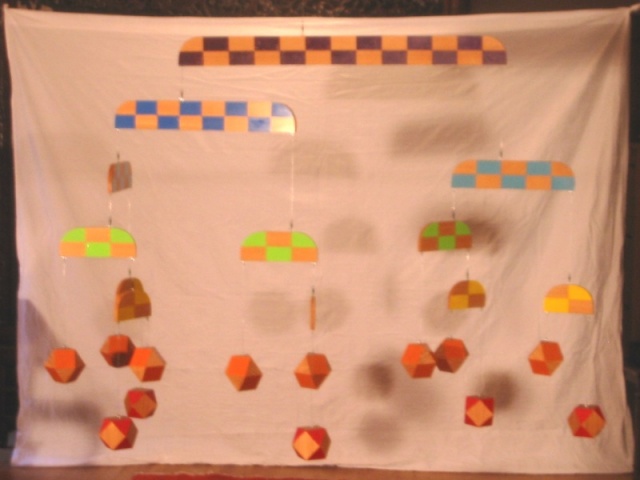
Mobile in a more Chaotic Alignment
A short video clip of the Fibonacci Mobile in motion
(Click the arrow at the lower left to start)
Balancing Considerations
The design of the Fibonacci Mobile assumes that the weight of every level is equal to the sum of the weights of the two sub-mobiles below it. This would be true if the arms and the suspending wires weighed nothing, and all of the weight of the mobile were in the blocks in the bottom two rows. In any real mobile, of course, this is not the case. There are several effects to take into account.
For one thing, the total weight of the arms will add to the weight of the blocks on each side. Consider the top level of the design. On the left, in addition to the 8 blocks, we have arms of length 8, 5, 3, 3, 2, 2, and 2. This gives us a total of 25 in arm weight. On the right we have only 5, 3, 2 and 2, for a total of 12. We want to have more weight on the left than the right, but it should be in the ratio of 8 to 5. What we have instead is a ratio greater than a 2 to 1, so the net effect is to put extra weight on the left hand side.
But we must also consider the arm weight of the current level. The top arm is three units longer on the right than on the left, so this will put more weight on the right hand side.
There are also the little curved bits I cut off the end of each arm. They were the same size, but since they were farther from the balance point on the right than on the left, this effectively removed more weight from the right than the left, and put more weight on the left hand side.
Finally, the eye screws that held the sub-mobiles were not placed exactly at the end of the arms, but were set in about 3/8 of an inch. Since this reduction represented a greater fraction of the shorter arms on the left side than the right, it effectively added weight to the right hand side.
So, when I actually found the balance points for each arm experimentally, I was happy to see that these effects cancelled each other out surprisingly well, and the top side eye screws ended up being very close to their theoretical placements. In fact, I placed some a bit toward the short side, and others a bit toward the long side. I assume this is a result of the less-than-perfect regularity of the blocks in the bottom two rows.
Installation
I taught math for a number of years at Lakeside School in Seattle, Washington. Lakesides Math/Science buiding, Allen-Gates Hall, has a large, two-story, sky-lit foyer, rather calling out for a sizeable piece of art. There is even a beam at the second floor ceiling level spanning the center with a ready-to-use eye screw that, I am told, once held a planetary model, but has been empty for many years.
So, one quiet Saturday morning, with the help of some unidentified co-conspirators, I contributed the Fibonacci Mobile to Lakeside School. There I hope it will inspire young mathematicians with its near perfect asymmetry.
The Fibonacci Mobile In Situ
A Final Mathematical Curiosity
When considering the amount of material (wood or paint, say) to be used at each level, I stumbled upon a small mathematical surprise. It is clear that the elements decrease in size, but increase in number from top to bottom. The amount of material for each level will be the product of the size and the number, so it should take roughly the same amount of paint, for example, to paint each level of the mobile. We check this assumption a little more closely:
| Level | Size | Number | Product |
|---|---|---|---|
| 1 | 13 | 1 | 13 |
| 2 | 8 | 1 | 8 |
| 3 | 5 | 2 | 10 |
| 4 | 3 | 3 | 9 |
| 5 | 2 | 5 | 10 |
| 6 | 1 | 8 | 8 |
| 7 | 1 | 13 | 13 |
The products near the middle rows are very close to each other, but variation increases towards either end. The amount of variation becomes easier to see when we use more numbers from the Fibonacci Sequence. Imagine, if you will, a Fibonacci Mobile of Order 89. Now the product of the middle row is 8 times 8 = 64, and if we calculate the difference between 64 and the product for any other row we get a new column for the variation:
| Level | Size | Number | Product | Variation |
|---|---|---|---|---|
| 1 | 89 | 1 | 89 | 25 |
| 2 | 55 | 1 | 55 | 9 |
| 3 | 34 | 2 | 68 | 4 |
| 4 | 21 | 3 | 63 | 1 |
| 5 | 13 | 5 | 65 | 1 |
| 6 | 8 | 8 | 64 | 0 |
| 7 | 5 | 13 | 65 | 1 |
| 8 | 3 | 21 | 63 | 1 |
| 9 | 2 | 34 | 68 | 4 |
| 10 | 1 | 55 | 55 | 9 |
| 11 | 1 | 89 | 89 | 25 |
Again, the variation is slight in the middle rows, and gets larger toward either end. The cool thing to notice is that the variation numbers are not only perfect squares, but are actually the squares of the Fibonacci Sequence going out in both directions from the center! This pattern will be seen in any size mobile.
The End
I hope you have enjoyed this presentation of the Fibonacci Mobile, and I hope you get to see it in person some day. If you have any questions or interesting observations you would like to share, please send a note to deanbal at comcast dot net.
Dean Ballard
December 2008